Want to make planning and managing your trips simpler and more convenient?
The "Trip List" screen in TravelPassport helps you organize your journeys at a glance and smoothly move on to your next action.
On this page, we’ll clearly explain the meaning of each button and icon displayed on the Trip List screen, as well as the basic usage, using real screenshots.
Whether you’re new to TravelPassport or already a user, we hope you find this guide helpful.
Trip List
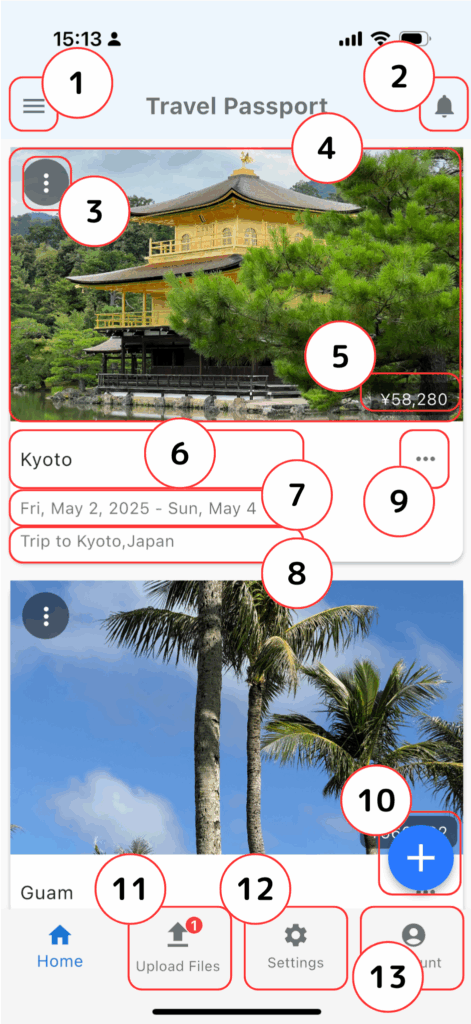
- Menu
- Displays the TravelPassport menu bar by sliding it in from the left side. For details, see "02. Menu."
- Notifications*
- Displays the Notifications screen. If there are unread notifications, a red number will appear on the top right of the notification icon.
- The Notifications screen shows pre-event notifications for trips, notifications about new posts on myTravelSupporter.com, and notifications about TravelPassport updates.
- Trip Menu
- Displays the trip menu. For details, see "03. Trip Menu."
- Trip Image
- An image representing each trip is displayed. You can select an image from the trip edit screen.
- Tapping the trip image will display the event list page for that trip.
- You can change the order of your trips by long-pressing a trip image on the trip list screen. For more details, please see “05. Sorting Travel Data.”
- Trip Expenses
- Displays the total amount of expenses for each event registered on the event screen, converted to your home currency. (If no expenses are registered, nothing will be displayed.)
- Trip Title
- Displays the trip title. This can be edited from the trip edit screen.
- Duration
- Displays the duration of the trip. This can be edited from the trip edit screen.
- Description
- Displays the description of the trip. This can be edited from the trip edit screen, but if nothing is registered, nothing will be displayed.
- Options Menu
- Displays the options menu. For details, see "04. Options Menu."
- Add
- You can add a new trip with this button.
- File Registration
- Tap here to register ticket files, backup files, etc. to TravelPassport.
- To assign a registered file to an event, please do so from the event list screen.
- Settings*
- Displays the settings screen. You can configure basic settings related to TravelPassport, such as display options for trip data and your home currency.
- Account*
- Displays the account screen. The account screen allows you to view user information, basic contacts, passports, and other identification documents.
*For details on the Notifications, Settings, and Account screens, please see the user guide, which will be added later.
メニュー
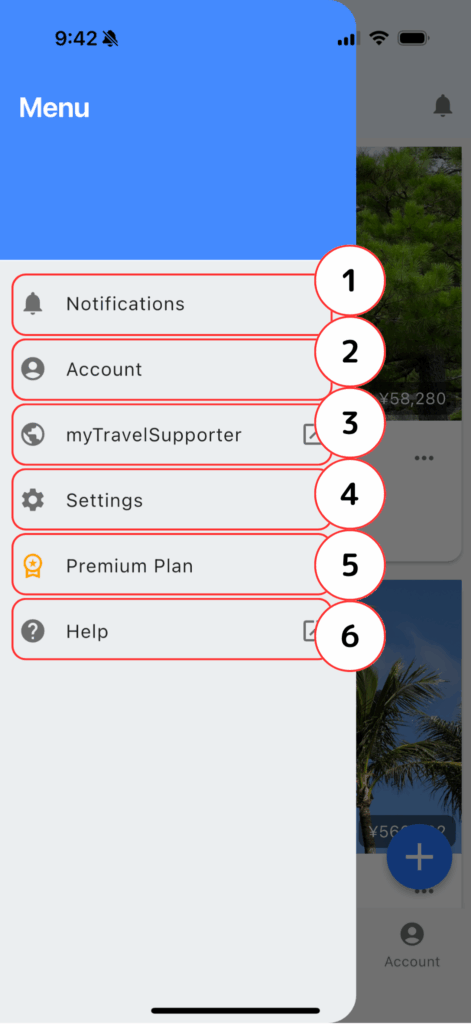
- Notifications
- Displays the Notifications screen. If there are unread notifications, a red number will appear on the top right of the notification icon.
- The Notifications screen shows pre-event notifications for trips, notifications about new posts on myTravelSupporter.com, and notifications about TravelPassport updates.
- Account
- Displays the account screen. The account screen allows you to view user information, basic contacts, passports, and other identification documents.
- myTravelSupporter
- Displays the top page of the website myTravelSupporter (https://mytravelsupporter.com/).
- Settings
- Displays the settings screen. You can configure basic settings related to TravelPassport, such as display options for trip data and your home currency.
- Premium Plan
- Displays the screen for purchasing the Premium Plan.
- Help
- Displays the top page (introduction page) of TravelPassport.
Trip Menu
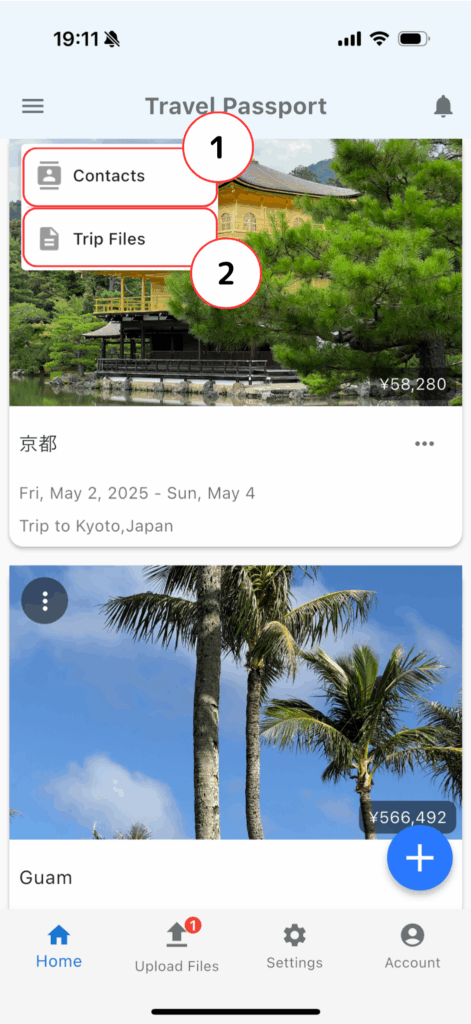
- Contacts
- Displays the contacts associated with the trip. Contacts can be edited from the contacts screen.
- Trip Files
- Displays the trip plan associated with the trip. Please register trip plans from the trip edit screen.
- By attaching documents such as travel itineraries related to the entire trip, you can display files separately from events.
Options Menu
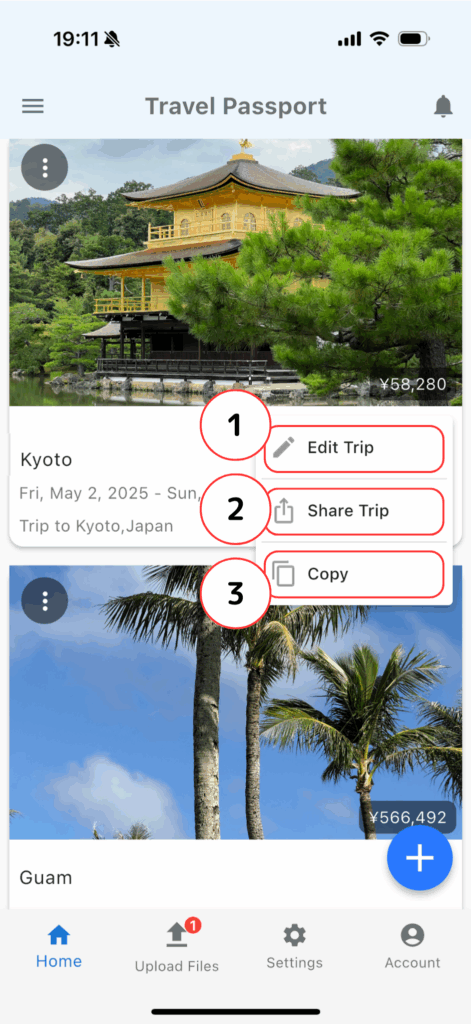
- Edit Trip
- Displays the trip edit screen.
- Share
- You can share or back up trip data for each trip.
- Copy
- Copies the trip. Useful for similar trips or business trips.
Sorting Travel Data
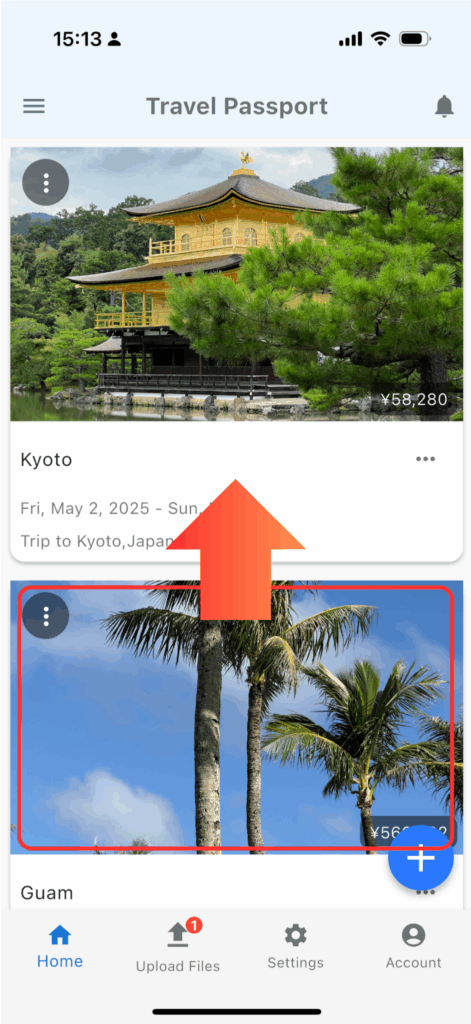
You can rearrange your travel data by long-pressing the trip image you want to move and dragging it up or down.
By moving frequently used travel data to the top, you can display your preferred trips more quickly and efficiently.
How was it?
If you master the Trip List screen, managing your travel plans and information will become much easier.
We will continue to introduce other features and screens in this user guide, so please check back regularly!
