When you first open the "Events" screen in TravelPassport, you might feel overwhelmed by all the information. But in fact, this screen is packed with useful hints to make your travels smoother.
In this article, we’ll walk you through every detail shown on the Event List so you can understand it clearly.
Once you know how to navigate it, TravelPassport becomes a more fun and useful app to plan and manage your trips!
Where is the Event Screen? Basic Access Guide
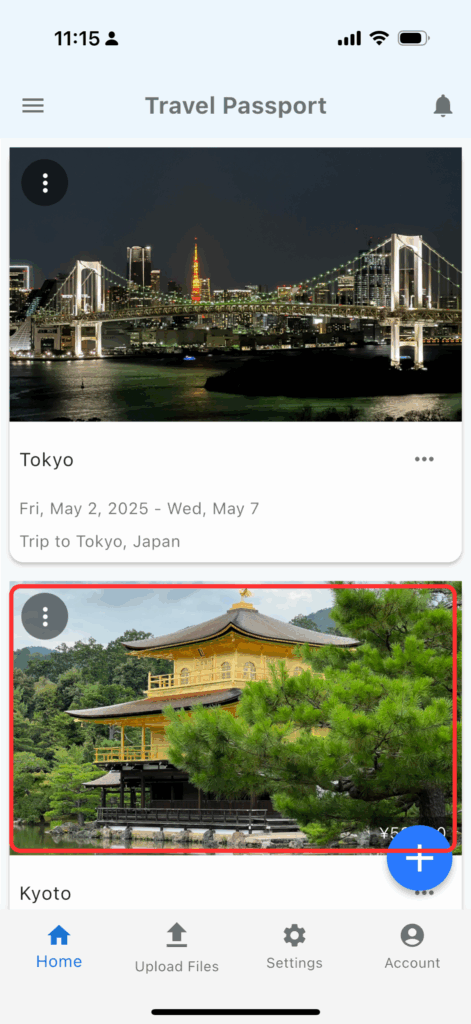
After launching the TravelPassport app, tap on the trip tile from the Trip List to display its event details.
There are two ways to view the Event List: Tile View and List View.
By default, Tile View is selected, but the app will remember your last selected view mode and use it as default next time.
- For details on Tile View: see [02 Tile View - Items Displayed and What They Mean]
- For details on List View: see [04 List View - Items Displayed and What They Mean]
Tile View - Items Displayed and What They Mean
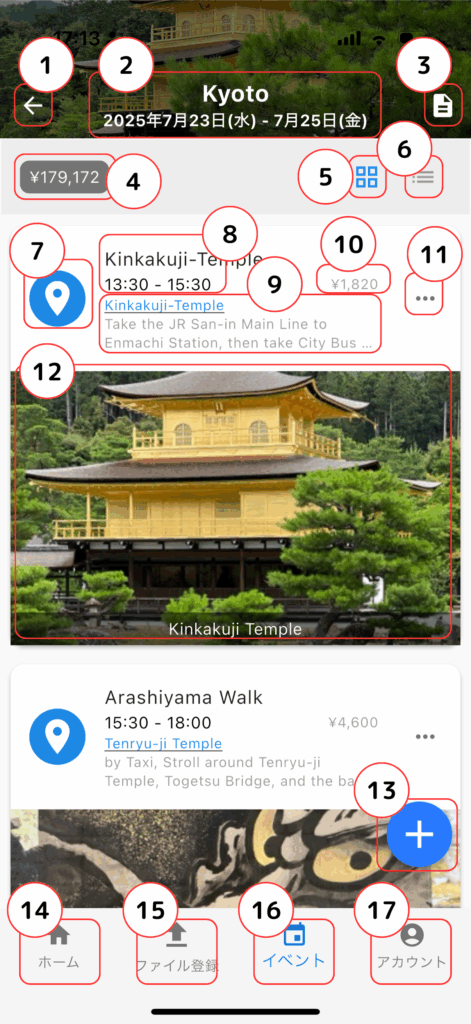
- Back Button
- Returns to the Trip List screen.
- Trip Title and Schedule
- Displays the trip title and the start-end dates.
- Trip Plans
- Shows plans (e.g., itineraries) linked to the trip.
- These can be added via the trip editing screen.
- Trip Cost
- Shows the total cost of all registered events in your home currency (if costs are registered).
- Tile View Selector
- Switches the Event List to Tile View.
- The icon color changes depending on the current mode (blue = selected, gray = not selected).
- List View Selector
- Switches the Event List to List View.
- The icon color changes depending on the current mode (blue = selected, gray = not selected).
- Event Icon
- Displays the icon registered for the event.
- Event Title and Start-End Time
- Shows the event title, start time, and end time.
- Time zones adjust automatically to the current device setting.
- Location and Description
- If a location is registered, a Google Maps link will appear.
- If a description is registered, it will be shown as well.
- Event Cost
- Displays the event cost in the specified currency (if registered).
- Event Menu
- Displays the event menu. For more details, refer to [03 Tile View - Event Menu].
- Tickets
- Thumbnail view of attached tickets.
- Tap to open ticket details. If multiple tickets are registered, you can swipe to switch between them.
- For more details, refer to [06 Ticket Display].
- Add
- Tap to add a new event.。
- Home
- Displays the Trip List screen.
- File Upload
- Upload or select a ticket file before adding a new event.
- Use this when uploading ticket files, backup files, or other documents to TravelPassport.
- Events
- Indicates that the Event List screen is being displayed.
- Account
- Opens the Account screen, where you can view user information, contact details, passport info, and other identification documents.
The red badge on File Upload shows the number of unassigned tickets.
While traveling abroad, the time zone will automatically switch based on your device: your departure location before travel, and the destination’s time zone after arrival (requires internet connection).
Tile View - Event Menu
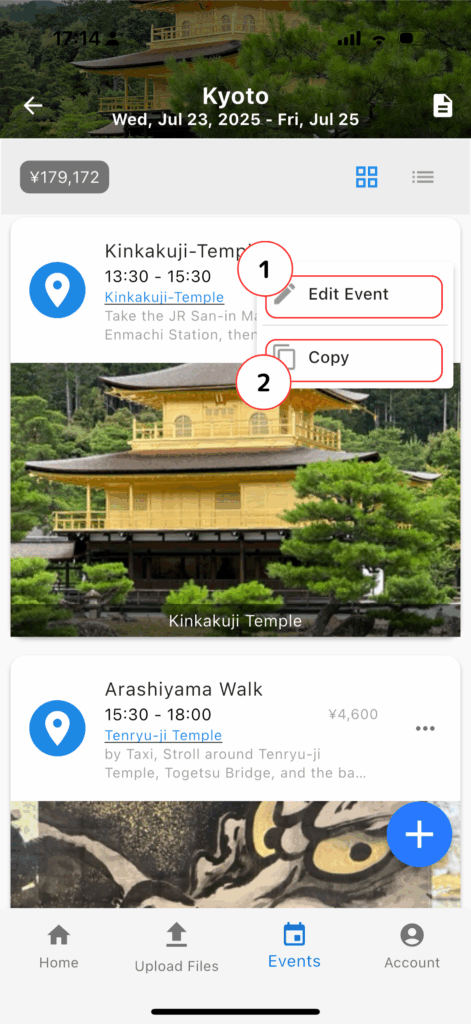
- Edit Event
- Takes you to the Event Edit screen.
- Copy
- Copies the selected event.
List View - Items Displayed and What They Mean
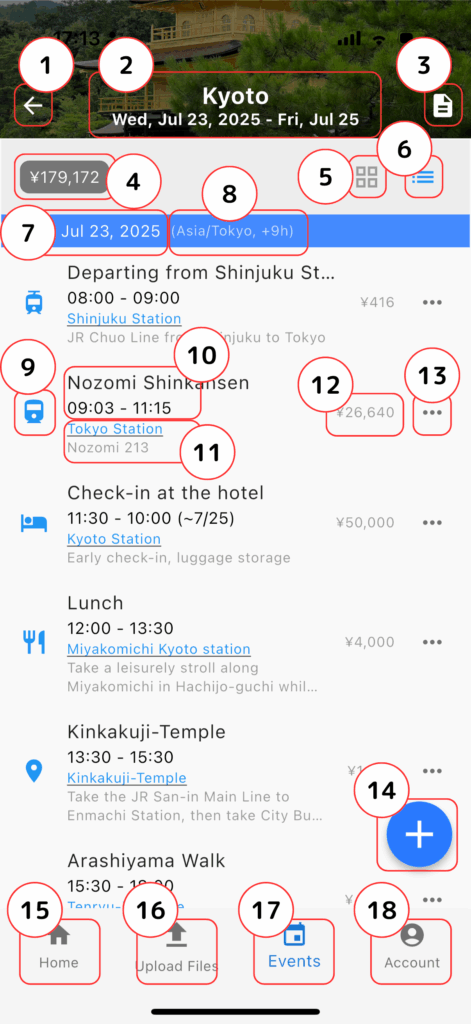
- Back Button
- Returns to the Trip List screen.
- Trip Title and Schedule
- Displays the trip title and the start-end dates.
- Trip Plans
- Shows plans (e.g., itineraries) linked to the trip.
- These can be added via the trip editing screen.
- Trip Cost
- Displays the total cost of all registered events in your home currency (if costs are registered).
- Tile View Selector
- Switches the Event List to Tile View.
- Icon color: blue = selected, gray = not selected.
- List View Selector
- Switches the Event List to List View.
- Icon color: blue = selected, gray = not selected.
- Date Labels
- Displays the event start date.
- Dates within the trip duration appear in blue; those outside appear in gray.
- In List View, all dates within the trip period are shown.
- In Tile View, only dates with events are shown.
- Time Zone
- Displays based on the current device’s time zone.
- Event Icon
- Displays the registered icon.
- Event Title and Start-End Time
- Shows the title, start, and end times.
- Automatically adjusted to your device's current time zone.
- Tap to view the ticket.
- For more details, refer to [06 Ticket Display].
- Location and Description
- Google Maps link appears if a location is registered.
- Description appears if provided.
- Event Cost
- Displays the cost in the selected currency (if registered).
- Event Menu
- Displays the event menu. For more details, refer to [05 List View - Event Menu].
- Add
- Tap to add a new event.
- Home
- Shows the Trip List screen.
- Upload Files
- Register or select tickets before adding a new event.
- Tap this when uploading ticket files, backup data, etc.
- Events
- Indicates that the Event List screen is active.
- Account
- Displays the Account screen, where user info, contact details, passport, and other IDs can be managed.
The red badge on File Upload indicates the number of unassigned tickets.
When traveling internationally, your device will automatically switch time zones based on your location—your home country before departure, and the destination after arrival (requires internet access).
List View - Event Menu
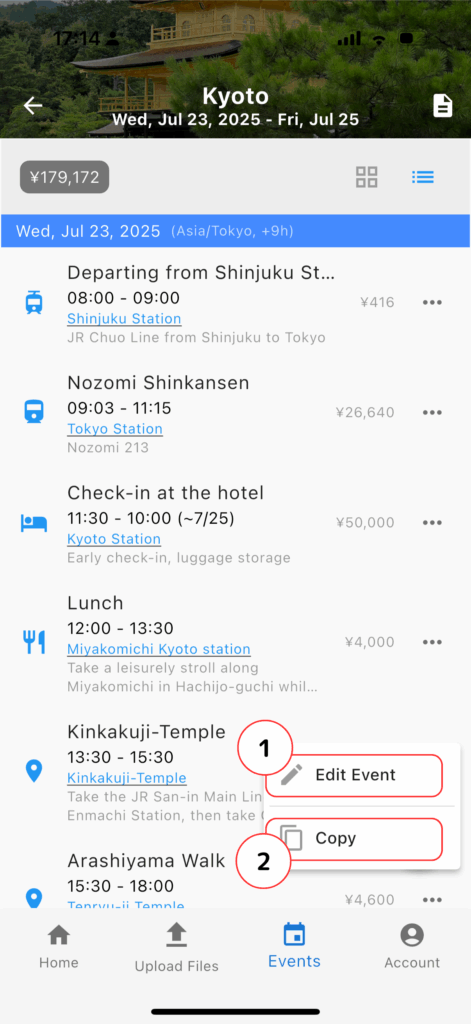
- Edit Event
- Takes you to the Event Edit screen.
- Copy
- Duplicates the event.
Ticket Display
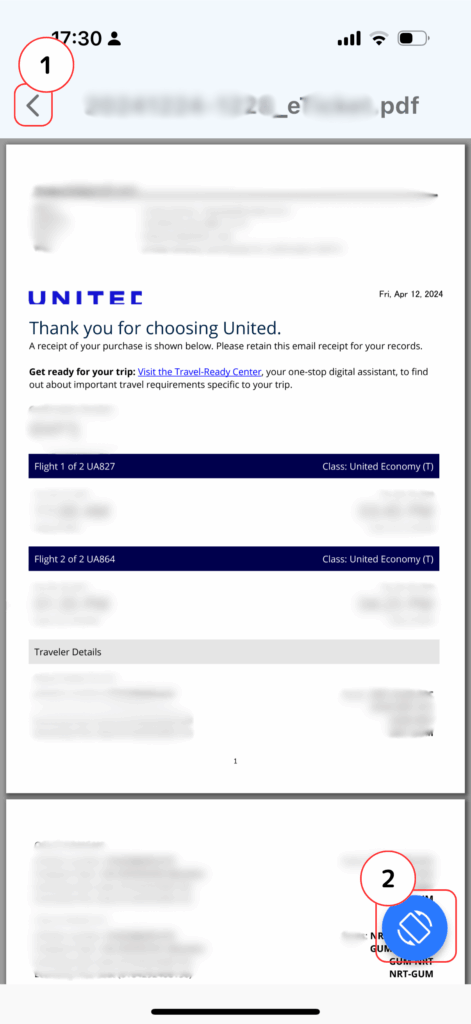
- Back Button
- Tap this to return to the Event List screen.
- Rotate Ticket Button
- Rotates the ticket 180 degrees. Useful when showing your ticket to someone face-to-face.
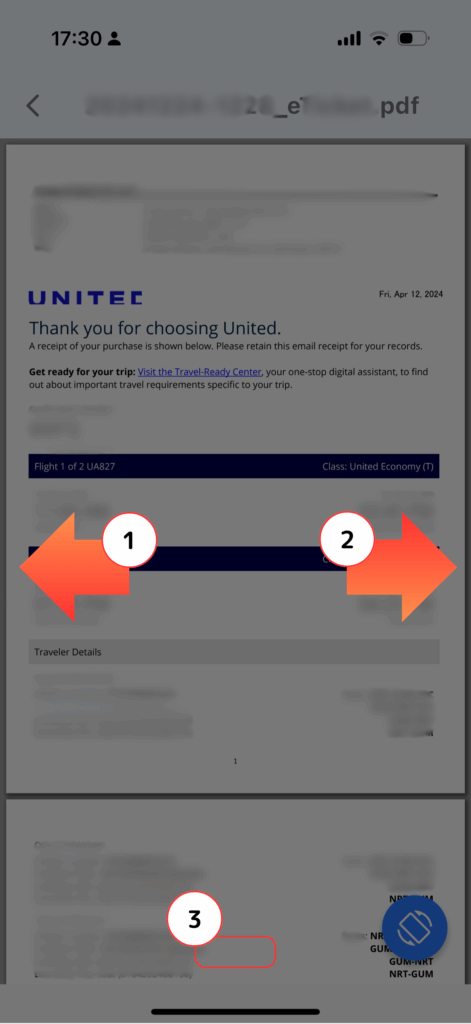
- Swipe Left
- If multiple tickets are registered, swiping left will display the previous ticket.
- Swipe Right
- If multiple tickets are available, swiping right will display the next ticket.
- Ticket Indicator
- Located at the bottom of the screen, the indicator visually shows which ticket you're currently viewing among all registered tickets.
The Event List screen in TravelPassport is an essential tool for understanding your trip at a glance. Use event icons, ticket attachments, and Google Maps links to build a personalized itinerary that suits your travel style!
